![]()
This note was written two years ago for my colleagues as an Introduction to Network Service Mesh
Introduction
Multifaceted networks such as telcos, ISPs and advanced enterprise networks are rearchitecting their solutions with the advent of a range of new networking technologies, including following:
- NFV1
- IoT devices
- 5G
- Edge computing
1 Network Function Virtualization
Each of these technologies increases the total number of connected devices, available bandwidth per device, and cloud service load. Operators of multifaceted networks with advanced L2/L3 use cases to find container networking solutions ill suited for their next-generation architecture. Lack of advanced networking support cases actively prevent multiple industries from adopting the new cloud native paradigm.
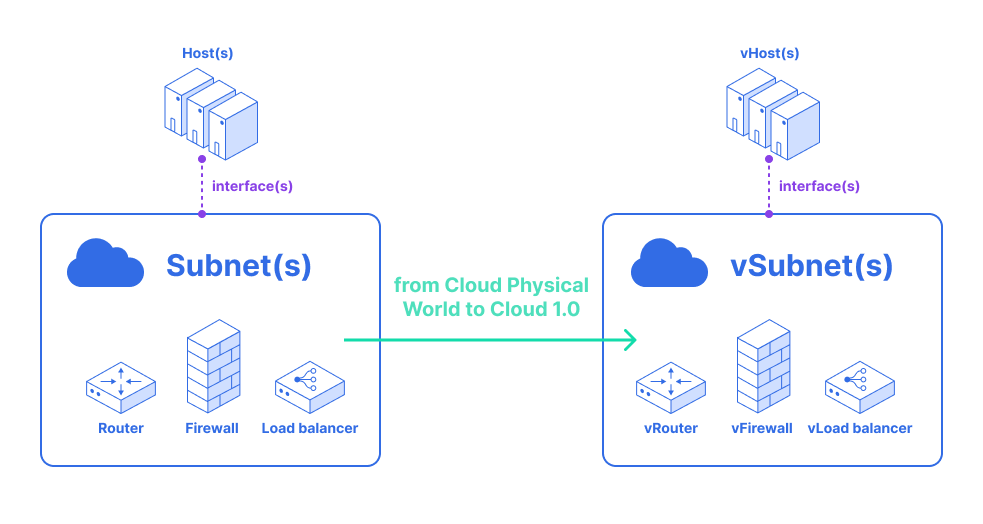
Current-generation container networking technologies focus on:
- Homogeneous
- Low-latency
- High-throughput
- Immutably deployed
- Ethernet/IP
- Enterprise application clusters
These assumptions do not fit the needs of telcos, ISPs and advanced enterprise networks. Current cloud native solutions allow dynamic deployment configuration but the deployment realization is mostly immutable. CNI deals only with the network allocation during a Pod’s initialization and removal phases and don’t aware of other network services. For the full advantage of the cloud native paradigm for NFV use cases, the following conditions have to be fulfilled:
- VNFs2 must be follow 12-factor apps
- NFV must provide API
2 Virtual Network Function
If these two conditions are met, NFV apps may be capable for horizontal scaling and making an efficient use of the networking resources.
Limitation of Kubernetes Network in NFV
As discussed above, the current model of Cloud Networks doesn’t fit the needs of telcos, ISPs and some advanced enterprise network. When trying to leverage Kubernetes powerful container orchestration capabilities in the NFV area, the Telecom industry found that Kubernetes network mode can’t meet NFVs needs.
It has the following limitations in network:
- Provide some advanced L2/L3 network features
- Meet dynamic network requirements of pods
- Support for
cross-cluster/multi-cloud/hybrid-cloudconnectivity
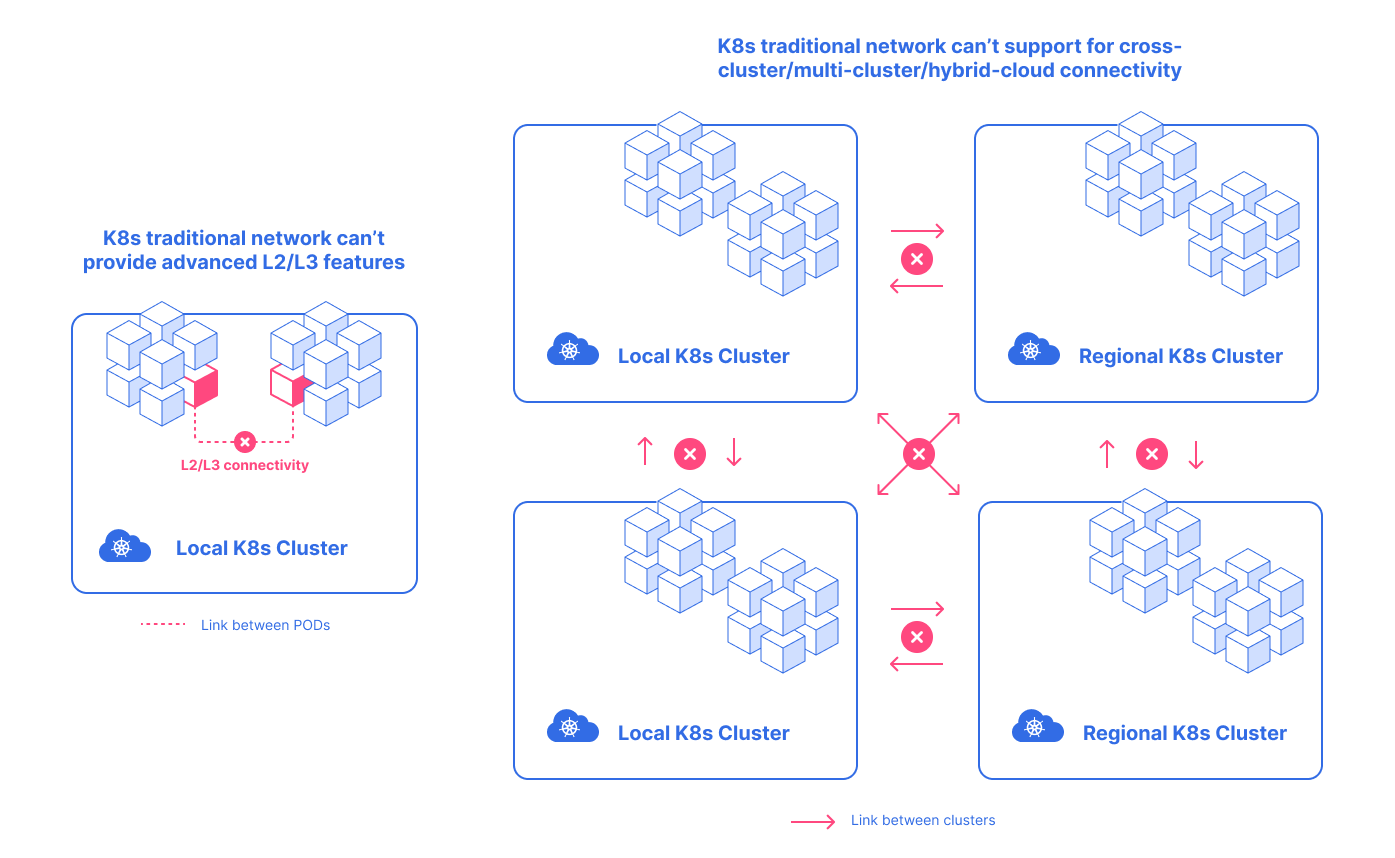
All the attempts to solve limitation issues mean to build cluster to cluster networking. In such a model, the «Connectivity domain» will be independent. If we try to connect «Connectivity domainr» with the ‘runtime’ it will fail and cause following problems:
- Inter-cluster workload isolation
- A lot of links among clusters
- Complex manual cluster to cluster link setup (public/private). For example: complex firewall rules
- Inter-cluster
Service Discovery/Routing
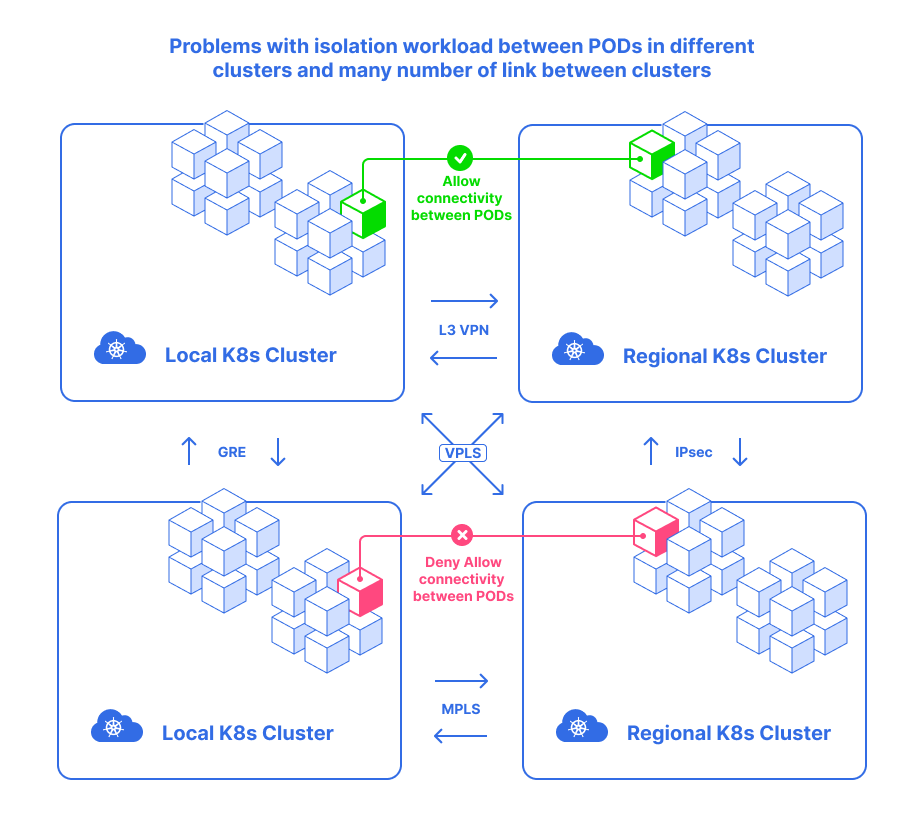
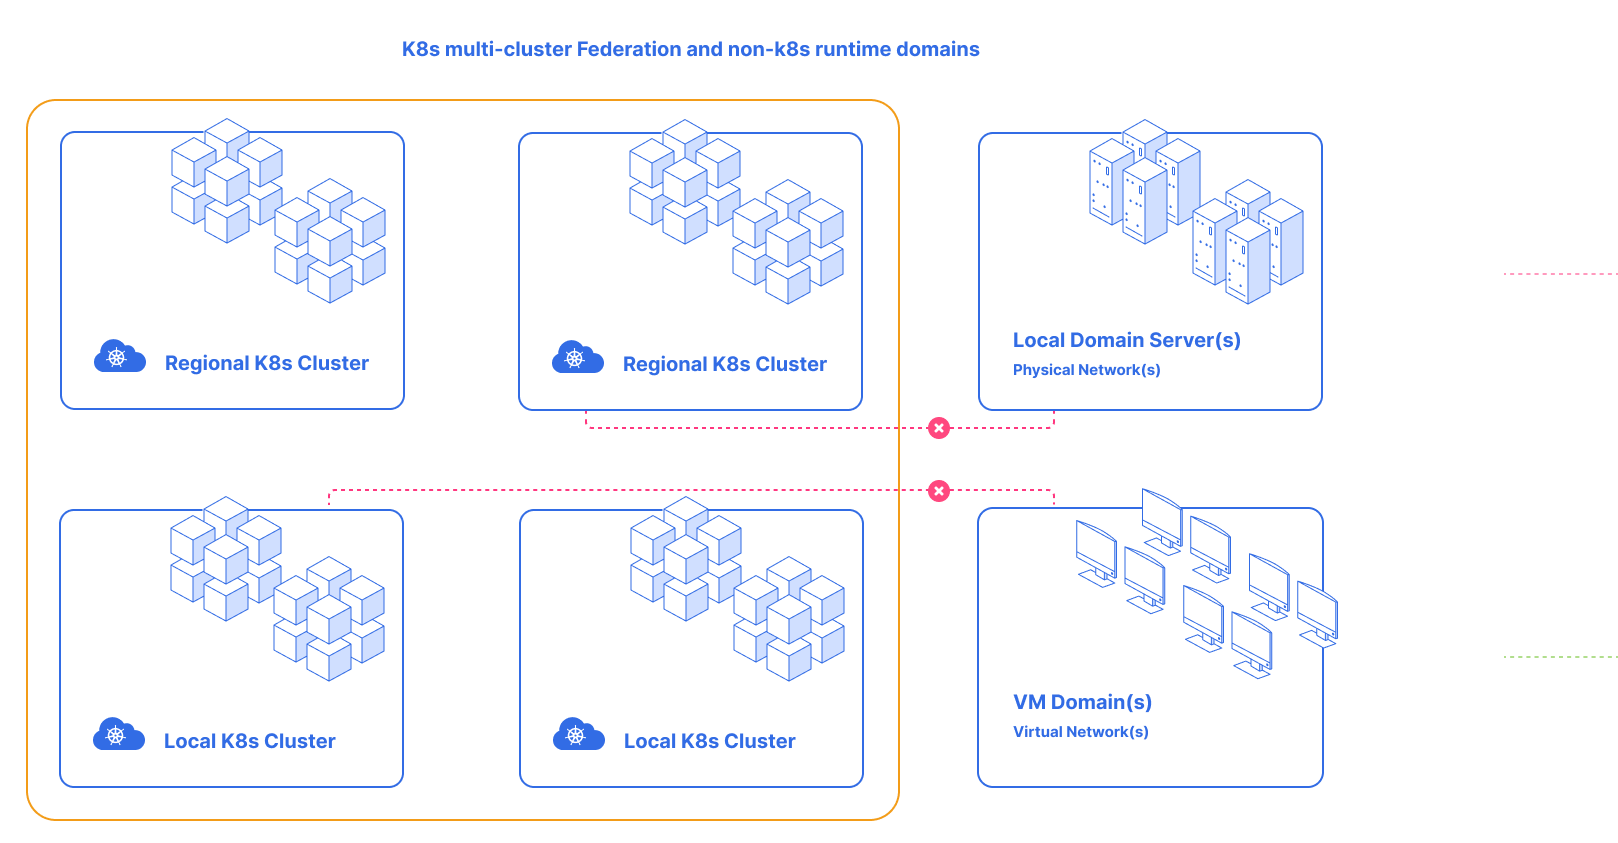
Building Kubernetes Ferderation multi-cluster causes the following problems:
- A lot of links among clusters
- Complexity management
- Services and
Network Policieshave enough troubles with scaling in a single cluster because of low latency updates - Incompatible with
non-Kubernetesruntime domains
We should’t take these limitations as issues in architecture Kubernetes. Kubernetes was designed as an orchestration tool and it’s current network model has already supported the inter-communication among the pods very well. To solve this problem we should connect workload to workload independently from the runtime domain.
What is the Network Service Mesh?
Network Service Mesh (NSM) is a CNCF project that provides advanced L2/L3 networking capabilities for the applications deployed in Kubernetes. NSM is not an implementation or an extension of CNI, it’s a totally different mechanism, that consists of a number of components that can be deployed in or out of a Kubernetes cluster.
NSM adds the following properties for networking in Kubernetes:
- Exotic protocols
- Tunneling as a first-class citizen
- Heterogeneous network configurations
- Minimal need for changes to Kubernetes
- Networking context as a first-class citizen
- Policy-driven service function chaining (
SFC3) - On-demand, dynamic, negotiated connections
3 Service Function Chaining
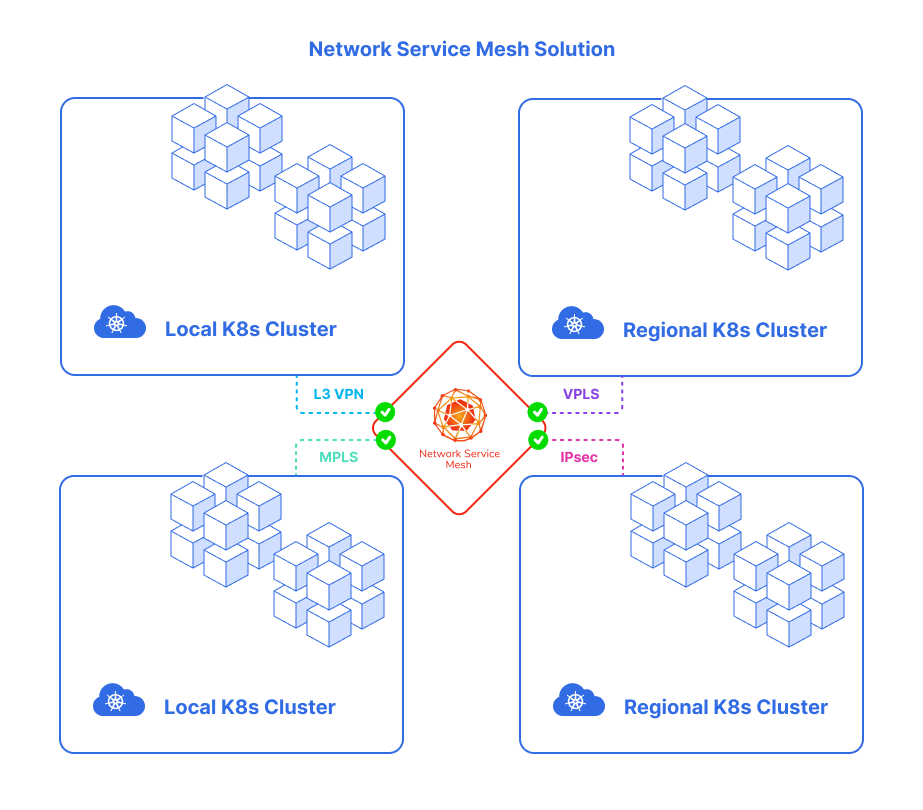
NSM architecture
NSM contains such components:
Network Service Endpoint (NSE): the implementation of Network Services, which can be a container, pod, virtual machine or physical forwarder. A network service endpoint accepts connection requests from clients which want to receive the Network Service offered.Network Service Client (NSC): a requester or a consumer of the Network Service.Network service registry (MSR)the registry of NSM components includingNS,NSE, andNSMgr.Network Service Manager (NSMgr)the control plane of NSM. It is deployed as a daemon set on each node.NSMgrcommunicates with each other to form a distributed control plane.NSMgris mainly responsible for two things:- It accepts the Network Service requests from the NSC and matches the request with appropriate NSE, then creates the virtual wire between the NSC and NSE (the actual job is done by the data plane component)
- Register the NSE on its node to the NSR.
Network Service Mesh Forwarder: the data plane component provides end-to-end connections, wires, mechanisms and forwards elements to a network service. This may be achieved by provisioning mechanisms and configuring the forwarding elements directly. It can be also reached by making requests to an intermediate control plane which acts as a proxy and capable of providing the four components. These components are needed to realize the network service. For instance:FD.io4 (VPP),OvS5,Kernel Networking,SR-IOV6, etc.
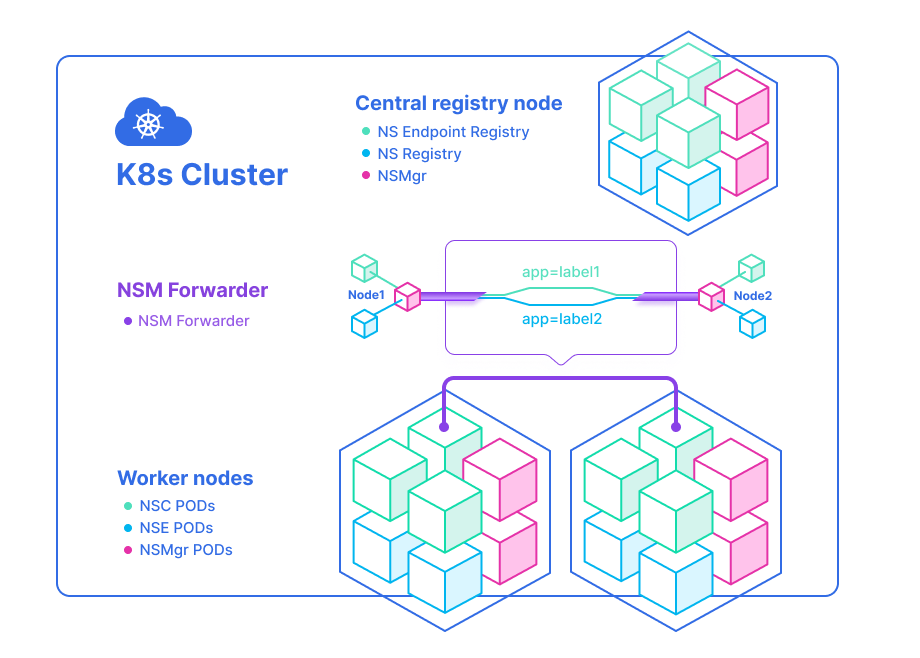
NSM deploys an NSMgr on each Node in the cluster. These NSMgr’s talk to each other to select appropriate NSE to meet the Network Service requests from the clients and create a virtual wire between the client and the NSE. From the perspective, these NSMgrs form a mesh to provide L2/L3 network services for the applications, similar to a Service Mesh.
High level example communication between components:
Registry.FindNetworkServiceEndpointRemote.NetworkService.RequestConnection established
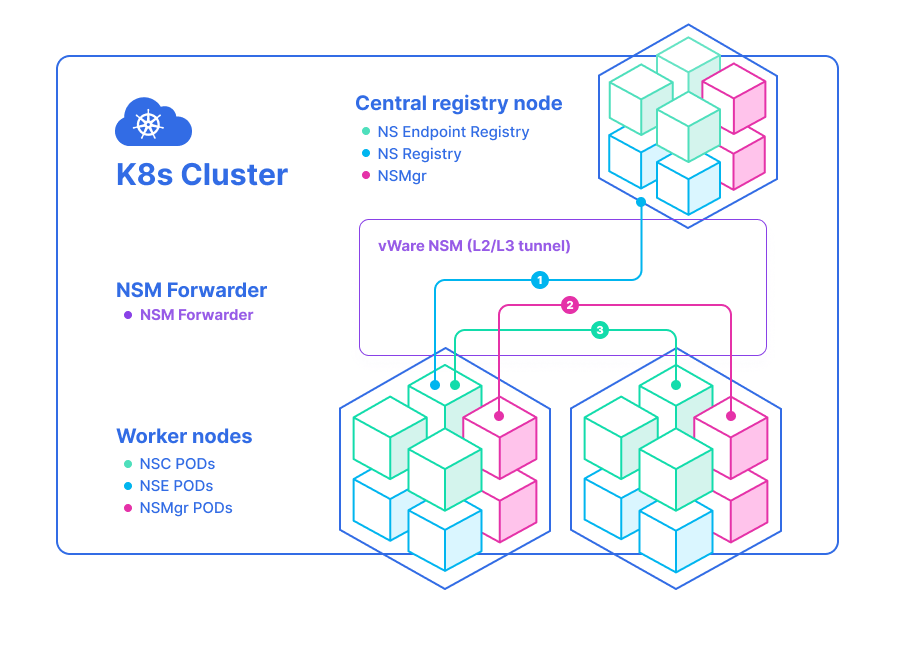
For more details, please see the secure-intranet example.
NSM and CNI
CNI works in the life cycle of Kubernetes runtime. It produce only network allocation during a pod’s initialization and phases removal and provides basic L3 connectivity in a cluster. Don’t expect that CNI can give more advanced networking capabilities. Unlike CNI, NSM works out of Kubernetes runtime life cycle, and it’s much more flexible. It is a powerful extension for Kubernetes network model that provides dynamic, advanced network services for pods. Various Network Services can be implemented by the third parties. The implementation details are wrapped into NSE but the network configuration is done by NSM. A client can request and use a Network Service just by a single line of annotation in YAML deployment file, without noticing all these details.
NSM and Service Mesh
A Service Mesh is a relatively plain concept, consisting of a bunch of network proxies paired with each service in an application, plus a set of task management processes. The proxies are called the data plane and the management processes are called the control plane in the Service Mesh. The data plane intercepts calls between different services and «processes» them; the control plane is the brain of the mesh that coordinates the behavior of proxies and provides APIs for operations and maintenance personnel to manipulate and observe the entire network. Modern applications often are broken down in this way, as a network of services each performing a specific business function. In order to execute its function, one service have to request data from several other services. But what if some services get overloaded with the requests such as database? In such a situation, a service mesh comes in it routes requests from one service to the next, optimizing how all the moving parts work together. Service Mesh adds the following properties to networking in Kubernetes:
- Infrastructure layer for secure
service-to-servicecommunication - Supports numerous service to service API formats (
HTTP 1/2,gRPC,TCP,UDP) - Supports inspect API transactions at L4/L7
- Intelligent routing rules can be applied between endpoints
- Supports advance policy, logging and telemetry
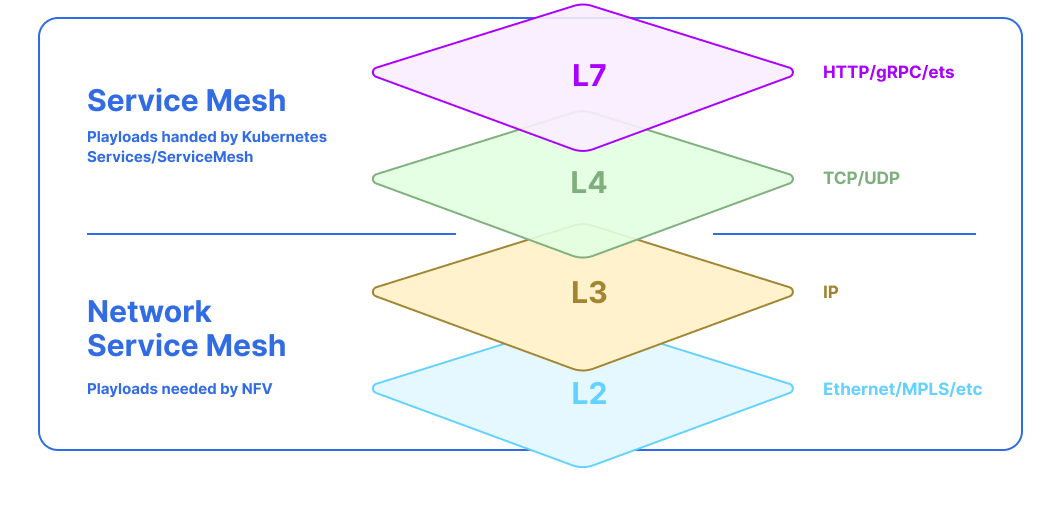
It’s very important to understand the difference between Service and Network Service. Kubernetes Service provides some kind of application L7 service for clients, such as HTTP or gRPC services. NSM defines Network Service in a similar way but, instead of L7, provides L2/L3 service.
The differences between Service and Network Service are the following:
Service: It’s application workload and provides services at the application layer (L7), such as web services.Network Service: It’s a network function and provides services at the L2/L3 layers, such as Bridge, Router, Firewall, DPI, VPN Gateway, etc.
Service Mesh works at L4/L7, handling service-to-service communication, such as service discovery, LB7, retries, circuit breaker, advanced routing with application layer headers and also providing security and insight for microservices.
7 Load Balancer
This partly solves the problems with Kubernetes flat network but remain such issues:
- Only works for L7, not for L3
- A lot of links between clusters
- Complex manual cluster to cluster link setup(public/private cloud)
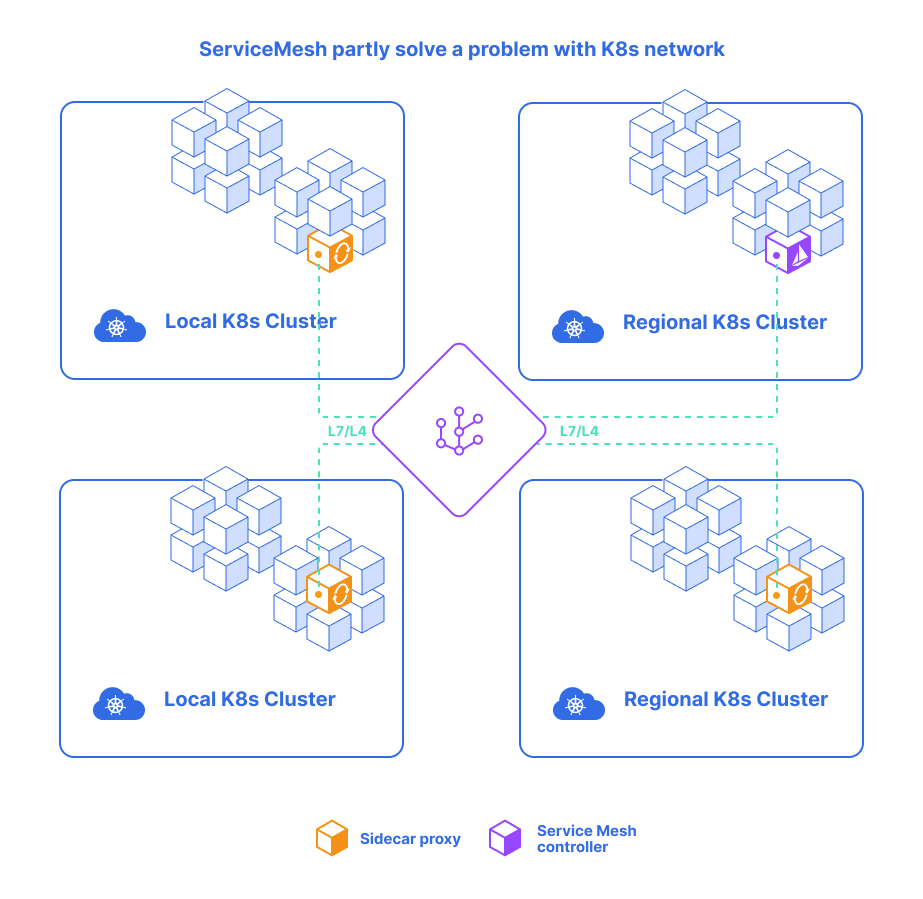
NSM uses the concept of Service Mesh but, as discussed above, they work on the different layers of the OSI model. NSM works at L2/L3, providing advanced L2/L3 network services such as virtual L2/L3 networks, VPNs, firewalls, and DPI, etc. Service Mesh and Network Service Mesh can work together.
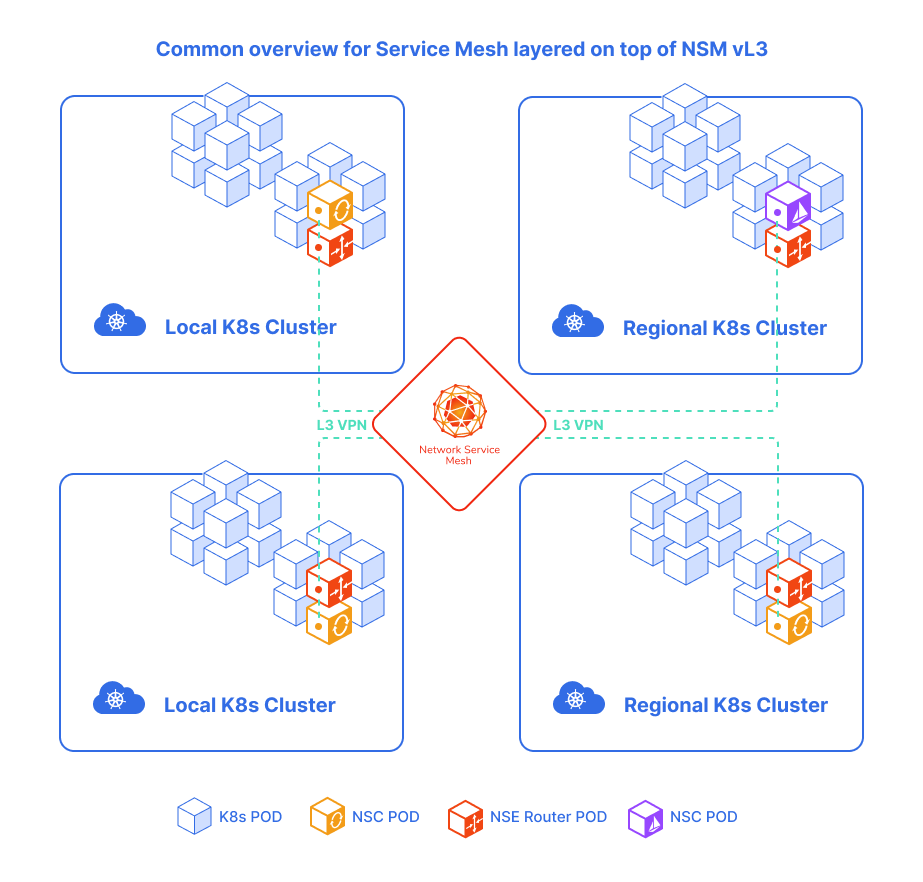
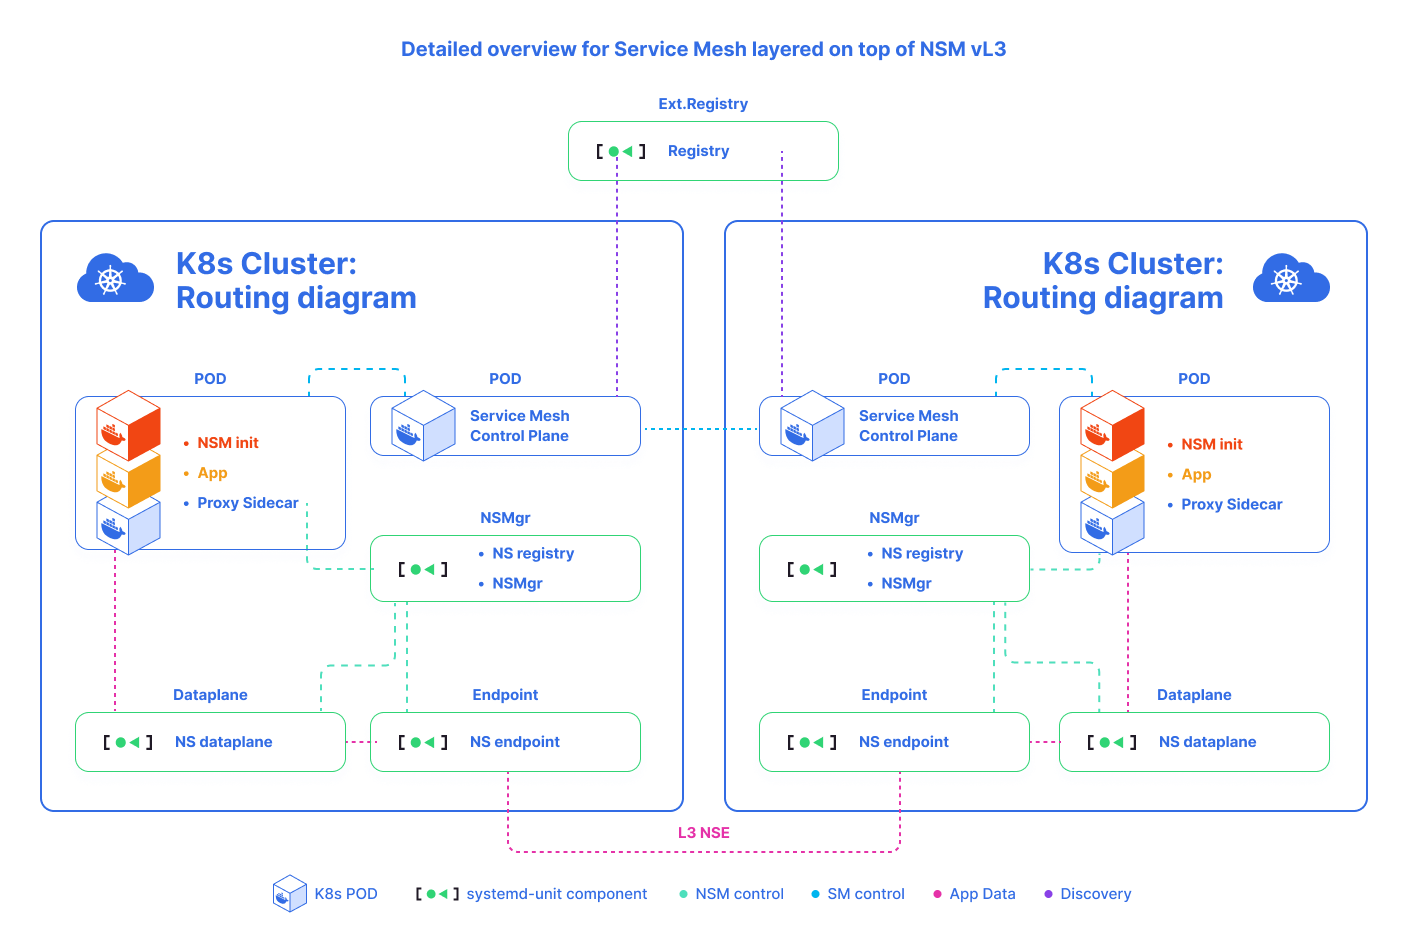
NSM and NFV
Network functions virtualization (NFV) is a way to virtualize network services, such as routers, firewalls, and LBs, that were traditionally run on proprietary hardware. These services are packaged as virtual machines on bare metall, which allows service providers to run their network on the standard servers instead of proprietary ones. In comparison to virtual machines, containers use less resources but more efficient than VMs. It can take minutes to bootstrap a VM, while a few seconds for a container. The presence of NSM provides a cloud-native NFV solution. It’s a must have in NFV and is missing in the container orchestrator Kubernetes networking capabilities.
With Kubernetes powerful orchestration, VNFs could be implemented as NSM Network Service, and these Network Services can be used to form Service Function Chains (SFC). They also can be easily horizontally scaled to meet different workloads.
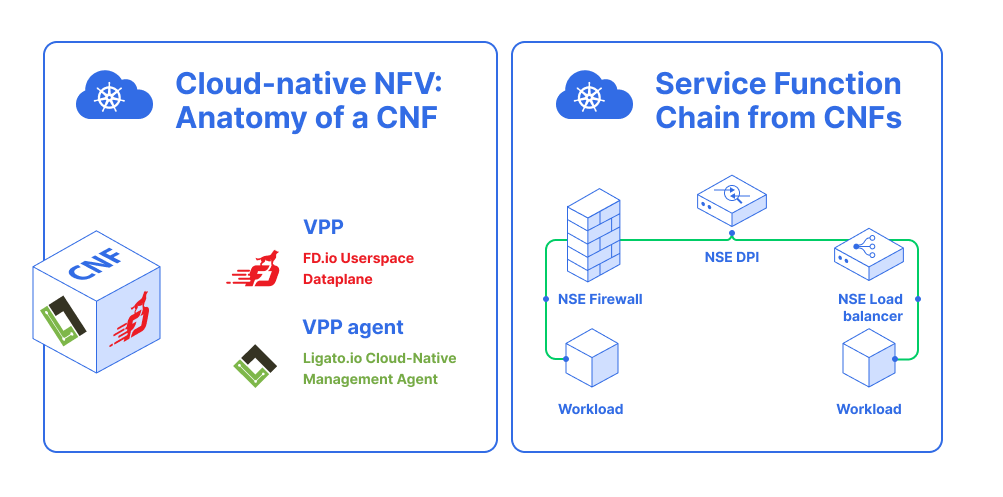
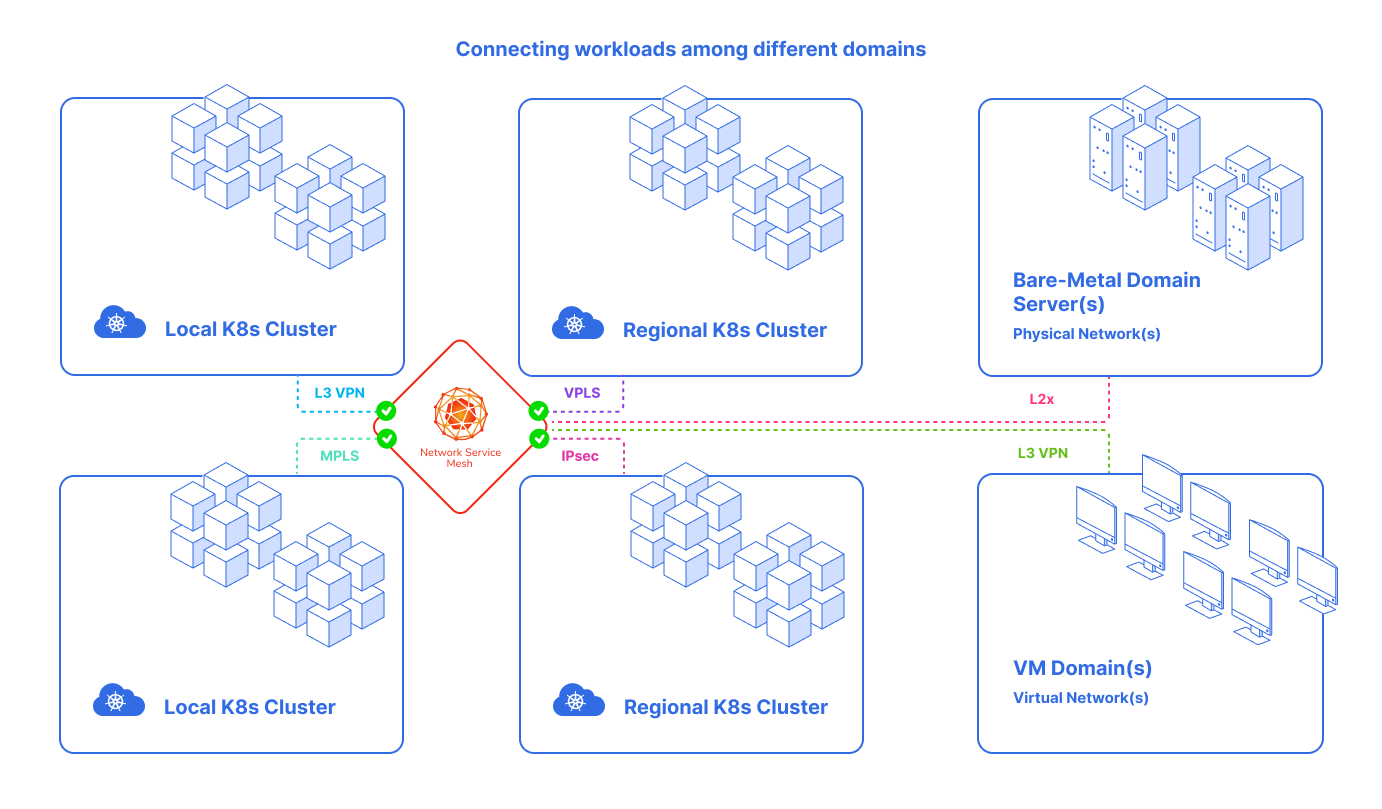
The NSM solution allows workloads to connect the new «connectivity domains» and provides the connectivity, security and observability features needed in that connectivity domain, and each connectivity domain has its own features. Therefore, workloads among different domains, such as VM and Server domains, can also connect to the Kubernetes domain.
the difference between VNF and CNF:
- VNF:
- VM Based
- Big
- Heavy
- Magic Kernel based dataplane
CNF8:- Containerized
- Small
- Light
- Userspace dataplane
8 Cloud-native Network Function
Examples
Build SFC secure-intranet
Network Service Mesh is capable of composing together many Endpoints to work together and to provide the desired Network Service. In the VPN example, the user wants a secure-intranet-connectivity with the traffic from the application Pod. Client passing through first a firewall, and then three other passthrough security appliances before finally getting to a VPN Gateway. This example shows how to build up one SFC from CNFs.
In the traditional way to do it, you need to have a VPN gateway installed somewhere your pod can reach it; also, need to configure network manually like the VPN gateway address, the subnet prefix and IP address, the routes to the corporate intranet, etc. In this example, the client just needs to connect the corporate intranet and do whatever it needs to do, so it shouldn’t care about the underlying implementation details of it, such as how the VPN is configured. We will configure VPN with the YAML language.
deployments/helm/vpn/templates/secure-intranet-connectivity.yaml
---
apiVersion: networkservicemesh.io/v1alpha1
kind: NetworkService
metadata:
  name: secure-intranet-connectivity
  spec:
    payload: IP
...
deployments/helm/vpn/templates/vpn-gateway-nse.tpl
---
apiVersion: apps/v1
kind: Deployment
spec:
  selector:
    matchLabels:
      networkservicemesh.io/app: "vpn-gateway"
      networkservicemesh.io/impl: "secure-intranet-connectivity"
  replicas: 1
  template:
    metadata:
      labels:
        networkservicemesh.io/app: "vpn-gateway"
        networkservicemesh.io/impl: "secure-intranet-connectivity"
...- Defines SFC secure-intranet-connectivity Network Service with the help of the
NetworkService CRD. The YAML specification shows that its NS acceptsIP payload, and it uses a selector to match pods with label app: firewall,app: passthrough-1,app: passthrough-2,app: passthrough-3andapp: vpn-gatewayas the backend pods that provides thisNetwork Services. - The client uses an annotation
ns.networkservicemesh.io: secure-intranet-connectivity to request for theNetwork Service.
NSM has an admission webhook deployed in Kubernetes, which injects an init container into the client pod. This init container requests the desired Network Service specified in the annotation by negotiating with the NSMgr in the same node. This process is transparent to the client, the application container is started after the Network Service has been set up by NSM.
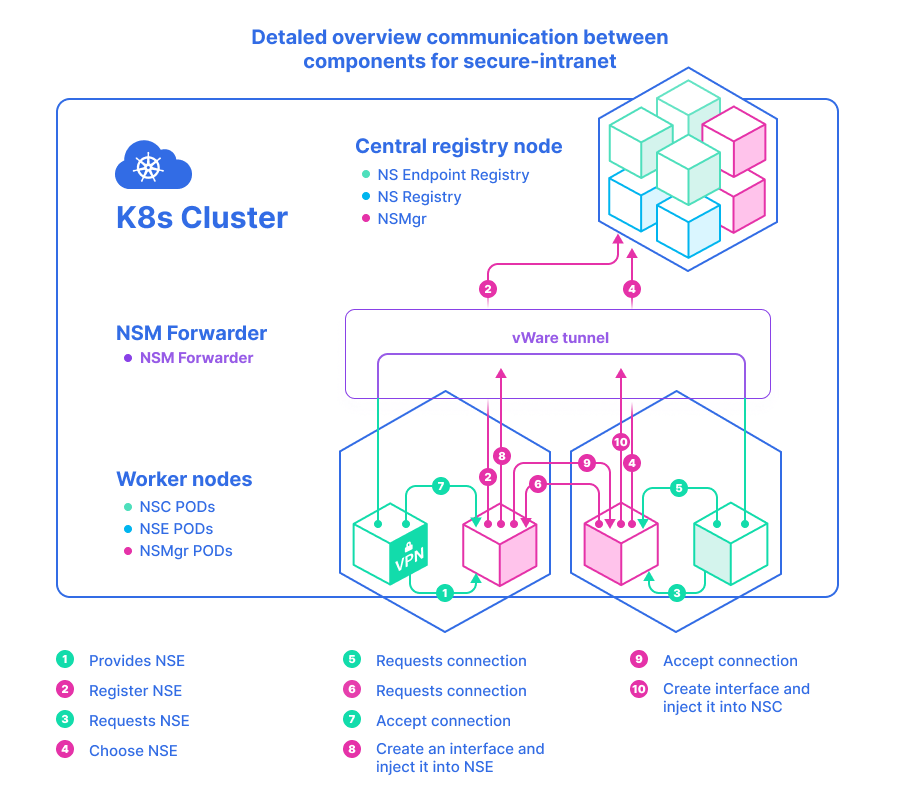
- vpn-gateway-nse and passthrough1/2/3-nse and firewall, were deployed to provide SFC secure-intranet
- NSMgr registers them as an NSEs to the API Server (Service Registry)`
- The NSM init container in the client pod sends a request for secure-intranet-connectivity network service to the NSMgr on the same node.
- NSMgr queries API Server (Service Registry) for available network service endpoints
- The chosen NSE may reside on the same or a different node. If it’s on a remote node, the NSMgr calls its peer on that node to forward the request
- The NSMgr on the NSE node requests a connection on behalf of the NSC
- The NSE accepts the request if it still has enough resources to handle it
- The NSMgr on the NSE node creates a network interface and inject it to the NSE’s Pod
- If the NSE and NSC are on different nodes, the NSMgr on the NSE node notifies the NSMgr on the NSC node that the service request has been. The NSMgr on the NSE node creates a network interface and inject it to the NSE’s Pod
- The NSMgr on the NSC node creates a network interface and inject it to the NSC’s pod, it also sets the routes to the corporate network
Pay your attention that the two interfaces on the NSC and NSE pods are connected with a virtual wire. The wire is established by NSM data plane, which could be a block of shared memory or a tunnel, depending on the locations of NSC and NSE.
Description components which will be installed
Name |
Label |
Description |
|---|---|---|
| vpn-gateway-nsc | - | The client |
| vppagent-firewall-nse | app=firewall | A passthrough firewall Endpoint |
| vppagent-passthrough-nse-1/2/3 | app=passthrough-1/2/3 | A generic passthrough Endpoint |
| vpn-gateway-nse | app=vpn-gateway | A simulated VPN Gateway |
The ClientrequestsNetwork Servicesecure-intranet-connectivity with no label. It falls all the way through the secure-intranet-connectivity matches to:
  - match:
      route:
        - destination:
          destinationSelector:
            app: "firewall"
The Firewall Endpointthen requests secure-intranet-connectivity with labelsapp=firewalland matches to:
  - match:
      sourceSelector:
        app: firewall
      route:
        - destination:
          destinationSelector:
app: "passthrough-1"- The
passthrough-1endpoint then requests secure-intranet-connectivity with labelsapp=passthrough-1and matches to:
 - match:
      sourceSelector:
        app: "passthrough-1"
      route:
        - destination:
          destinationSelector:
app: "passthrough-2"- The
passthrough-2endpoint then requests secure-intranet-connectivity with labelsapp=passthrough-2and matches to:
  - match:
      sourceSelector:
        app: "passthrough-2"
      route:
        - destination:
          destinationSelector:
app: "passthrough-3"- The
passthrough-3endpoint then requests secure-intranet-connectivity with labelsapp=passthrough-3and matches to:
  - match:
      sourceSelector:
        app: "passthrough-3"
      route:
        - destination:
          destinationSelector:
            app: "vpn-gateway"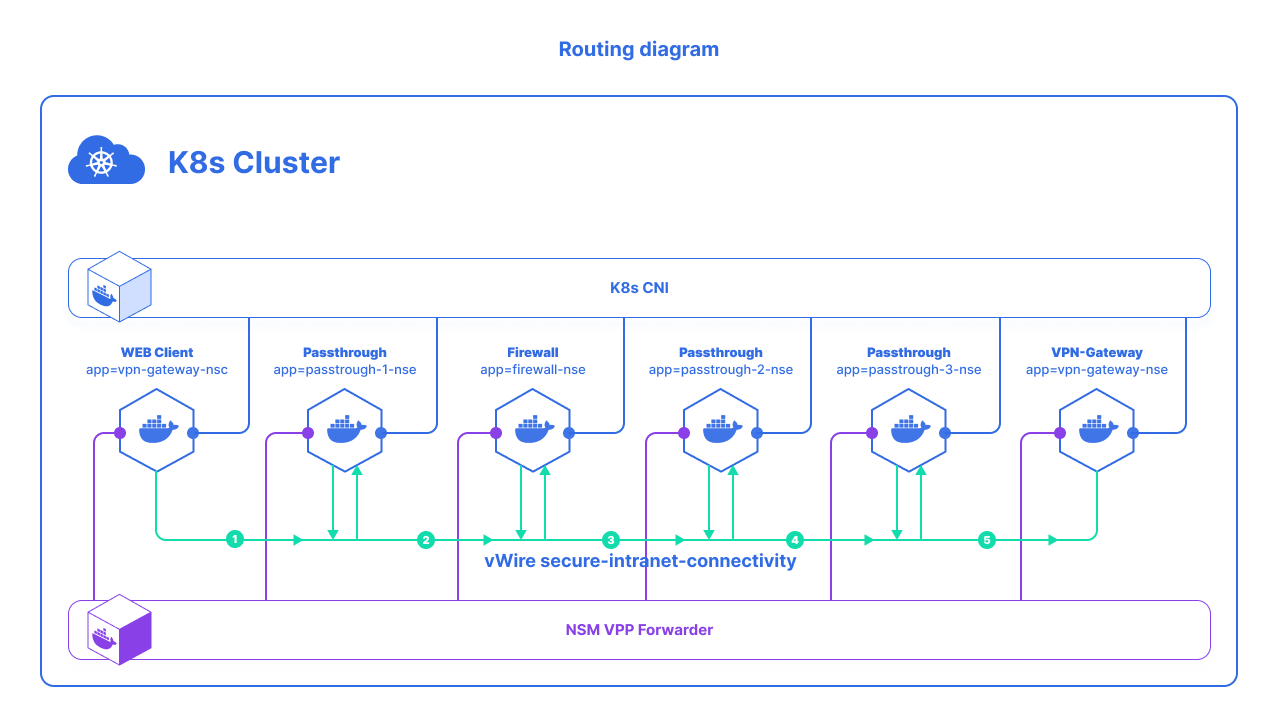
Playback demo
- Create Kubernetes cluster
- Install kubectl and Helm3
- Clone the following repository
git clone https://github.com/networkservicemesh/networkservicemesh.git- Deploy NSM using Helm
cd networkservicemesh
git checkout v0.2.0
helm3 upgrade -i nsm deployments/helm/nsm --set insecure=true,spire.enabled=false
kubectl get po -o wide- Deploy SFC
helm3 upgrade -i vpn deployments/helm/vpn
kubectl get po -o wide- To confirm that the client passes via firewall, we check firewall rules which were deployed with firewall CNF:
kubectl get cm vppagent-firewall-config-file -o yaml
...
data:
  config.yaml: |
    aclRules:
      "Allow ICMP": "action=reflect,icmptype=8"
      "Allow TCP 80": "action=reflect,tcplowport=80,tcpupport=80"
...
Only ICMP and TCP to 80 port allowed for client. Need check open ports to vpn-gateway pod:
kubectl exec -ti vpn-gateway-nse-657dfe4sc5-cdf4w -c vpn-gateway -- netstat -lntp
Active Internet connections (only servers)
Proto Recv-Q Send-Q Local Address           Foreign Address         State       PID/Program name
tcp        0      0 0.0.0.0:8080            0.0.0.0:*               LISTEN      -
tcp        0      0 0.0.0.0:80              0.0.0.0:*               LISTEN      -
And perform wget command on both ports:
kubectl exec -it vpn-gateway-nse-657dfe4sc5-cdf4w -c vpn-gateway -- ip a show dev nsm0
91: nsm0: <BROADCAST,MULTICAST,UP,LOWER_UP> mtu 1500 qdisc pfifo_fast state UNKNOWN qlen 1000
    link/ether c2:f1:63:28:b3:78 brd ff:ff:ff:ff:ff:ff
    inet 172.16.1.2/30 brd 172.16.1.3 scope global nsm0
       valid_lft forever preferred_lft forever

kubectl exec -it vpn-gateway-nsc-6568d968d7-cb8gn -c alpine-img -- wget -o /dev/null 172.16.1.2
Connecting to 172.16.1.2:80 (172.16.1.2:80)
saving to '/dev/null'
null                 100% |********************************|   112  0:00:00 ETA
'/dev/null' saved

kubectl exec -it vpn-gateway-nsc-6568d968d7-cb8gn -c alpine-img -- wget -o /dev/null 172.16.1.2:8080
Connecting to 172.16.1.2:8080 (172.16.1.2:8080)
wget: download timed out
As you can see, firewall blocked traffic to 8080 port. We can check work firewall automatically by using the script in the nsm repository:
$ sh scripts/verify_vpn_gateway.sh

===== >>>>> PROCESSING vpn-gateway-nsc-6568d968d7-cb8gn  <<<<< ===========
Defaulting container name to alpine-img.
Use 'kubectl describe pod/vpn-gateway-nsc-6568d968d7-cb8gn -n default' to see all of the containers in this pod.
Defaulting container name to alpine-img.
Use 'kubectl describe pod/vpn-gateway-nsc-6568d968d7-cb8gn -n default' to see all of the containers in this pod.
PING 172.16.1.2 (172.16.1.2): 56 data bytes
64 bytes from 172.16.1.2: seq=0 ttl=64 time=29.888 ms
64 bytes from 172.16.1.2: seq=1 ttl=64 time=19.966 ms
64 bytes from 172.16.1.2: seq=2 ttl=64 time=33.360 ms
64 bytes from 172.16.1.2: seq=3 ttl=64 time=11.663 ms
64 bytes from 172.16.1.2: seq=4 ttl=64 time=14.615 ms

--- 172.16.1.2 ping statistics ---
5 packets transmitted, 5 packets received, 0% packet loss
round-trip min/avg/max = 11.663/21.898/33.360 ms
NSC vpn-gateway-nsc-6568d968d7-cb8gn with IP 172.16.1.1/30 pinging vpn-gateway-nse TargetIP: 172.16.1.2 successful
Defaulting container name to alpine-img.
Use 'kubectl describe pod/vpn-gateway-nsc-6568d968d7-cb8gn -n default' to see all of the containers in this pod.
Connecting to 172.16.1.2:80 (172.16.1.2:80)
saving to '/dev/null'
null                 100% |********************************|   112  0:00:00 ETA
'/dev/null' saved
NSC vpn-gateway-nsc-6568d968d7-cb8gn with IP 172.16.1.1/30 accessing vpn-gateway-nse TargetIP: 172.16.1.2 TargetPort:80 successful
Defaulting container name to alpine-img.
Use 'kubectl describe pod/vpn-gateway-nsc-6568d968d7-cb8gn -n default' to see all of the containers in this pod.
Connecting to 172.16.1.2:8080 (172.16.1.2:8080)
wget: download timed out
command terminated with exit code 1
NSC vpn-gateway-nsc-6568d968d7-cb8gn with IP 172.16.1.1/30 blocked vpn-gateway-nse TargetIP: 172.16.1.2 TargetPort:8080
All check OK. NSC vpn-gateway-nsc-6568d968d7-cb8gn behaving as expected.
Building CNF with VPP and NSM
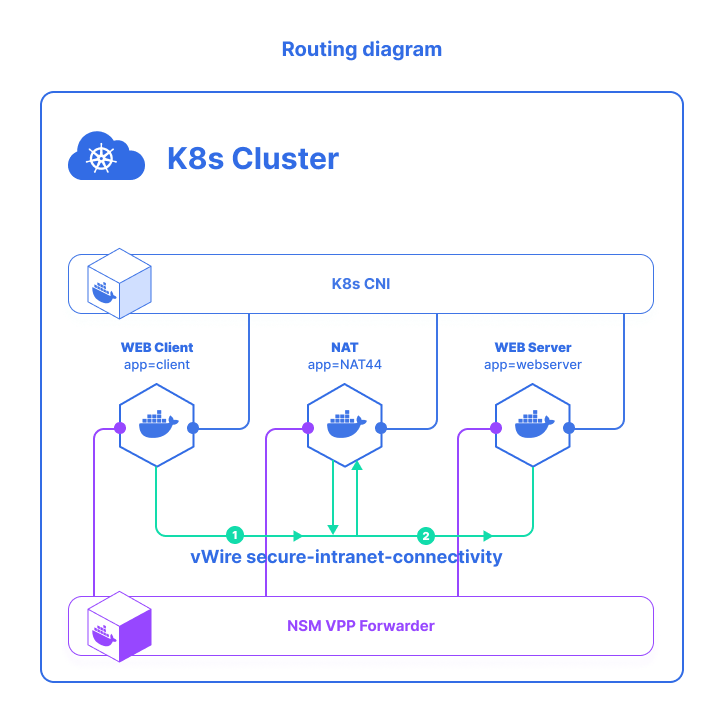
In our example, we will demonstrate working CNF in a Kubernetes cluster. Imagine that you provide ISP and your client needs connection to Internet for web-sites access. Let’s simulate a scenario where a client from a local network needs access to a web server with a public IP address. Hence, will need a NAT to implement that. Traditionally, you need to have a router with NAT function installed and configured in your network. Nevertheless, we use powerful NSM and Cloud-native Network Function instead. The necessary Network Address Translation is performed between the client and the webserver by deploying NAT function as a CNF inside a container. In another words, the client is represented as Kubernetes Pod running with web-client (e.g. curl/wget) installed. For the server-side, we used the TestHTTPServer completed in VPP.
NSM offers only the minimalistic point-to-point connections between pods. Everything that can be implemented via CNFs just left out of the framework. Even basic things as connecting a service chain with external physical interfaces or attaching multiple services to a common L2/L3 network are not supported. Instead, they are left to the users of NSM for implementation through the low-level SDK provided.
Such an approach has both pros and cons:
Pros: Gives more control over the interactions between the applications and NSM to the programmersCons: Requires a deeper understanding of the framework to get the things right
For instance, let’s install plugin which was developed for Ligato-based control-plane agent. With this plugin, it is easy to complete NSM in the Cloud-Native Deployment. Instead the option to use the low-level NSM SDK, the users can choose the standard API, in order to define the connections between their applications and other network services in a declarative form. Hereby the plugin uses NSM low-level SDK to open the connections and creates ready-to-use corresponding interfaces for the CNF.
Though the CNF components do not have to care about how the interfaces were created, they can simply use logical interface names for reference. This approach allows us to decouple the implementation of the network function provided by a CNF from the service networking/chaining that surrounds it. Most of the common network features are already provided by Ligato VPP-Agent. So, it is not necessary to do any additional programming work to develop a new CNF. With the help of the Ligato framework and NSM agent, achieving the desired network function is often a matter of defining network configuration in a declarative way inside one or more YAML files deployed as Kubernetes CRD instances. It is smoothly integrates the Ligato framework for Linux and VPP network configuration management, together with Network Service Mesh for separating the data plane from the control plane connectivity, between containers and external endpoints. This way, in all the three Pods an instance of NSM Agent is run to communicate with the NSM manager via NSM SDK and negotiate additional network connections to connect the pods into a chain client. The agents then use the features of the Ligato framework to further configure Linux and VPP networking around the additional interfaces provided by NSM.
The applied configuration is described decoratively and issubmitted to NSM agents in a Kubernetes native way through CRDs. The controller for this CRD simply reflects the content of applied CRD instances into an external etcd database from which it is read by NSM agents.
Description components which will be installed
Name |
Label |
Description |
|---|---|---|
| client | cnf-client | The client |
| cnf-nat44 | app=nat44 | NAT IPv4 Endpoint |
| web-server | app=webserver | The Webserver Endpoint |
| cnf-etcd | app=cnf-etcd | Kubernetes operator(controller |
This snippet shows the YAML definitions of the NAT network service:
---
apiVersion: networkservicemesh.io/v1alpha1
kind: NetworkService
metadata:
  name: cnf-nat-example
spec:
  payload: IP
  matches:
    - match:
      sourceSelector:
        app: client
      route:
        - destination:
          destinationSelector:
            app: nat44
    - match:
      sourceSelector:
        app: nat44
      route:
        - destination:
          destinationSelector:
            app: webserver
Defines NAT Network Service with NetworkService CRD. The YAML specification shows that NAT NS accepts IP payload, and it uses two selectors such as selectorSource and selectorDestination to match pods with label app: nat44 and app: webserver as the backend pods that provides this Network Service.
This snippet part shows the YAML definitions of NSM agent, which configure network interface on host via VPP:
    - module: cnf.nsm
      version: v1
      type: client
      data: |-
        name: access-to-cnf-network
        network_service: cnf-nat-example
        outgoing_labels:
          - key: app
            value: client
        interface_name: tap0
        interface_type: KERNEL_INTERFACE
        ipAddresses:
          - "192.168.100.10/24"
    - module: linux.l3
      type: route
      data: |-
        outgoing_interface: tap0
        scope: GLOBAL
        dst_network: 80.80.80.0/24
        gw_addr: 192.168.100.1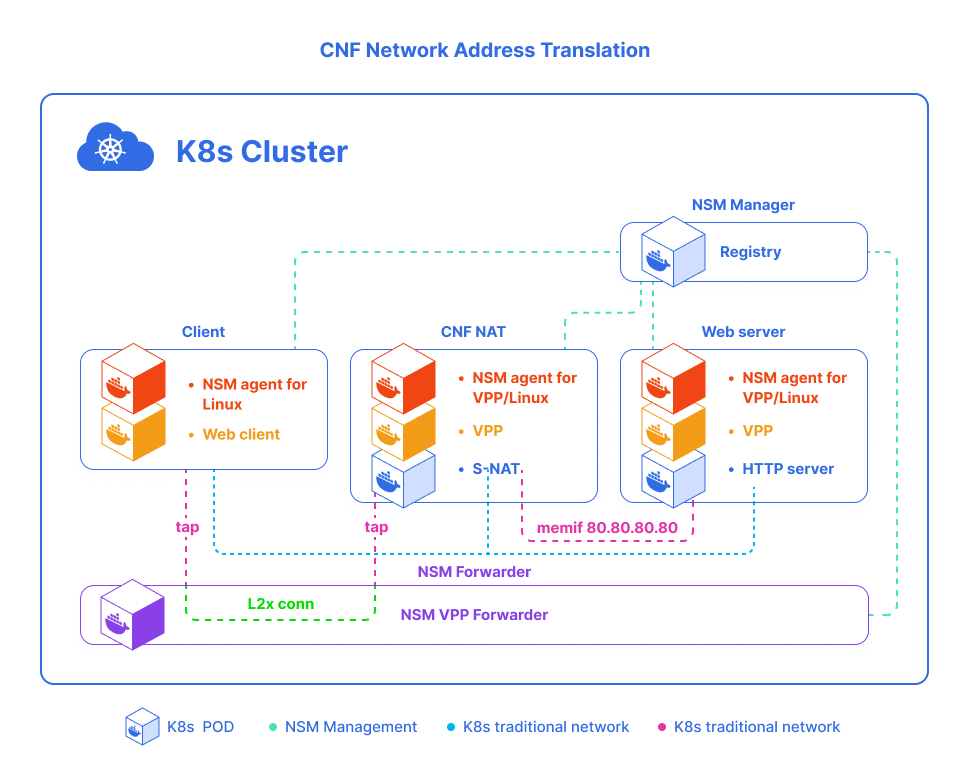
Playback demo
- Clone the following repository:
git clone https://github.com/PANTHEONtech/cnf-examples- Deploy CNF
cnf-crd.yaml- etcd + controller for CRD, both of which will be used together to pass configuration to NSM agentsnetwork-service.yaml- the definition of the network topology for this example to NSMwebserver.yaml- simple VPP-based webserver with NSM-Agent-VPP as control-planecnf-nat44.yaml- VPP-based NAT44 CNF with NSM-Agent-VPP as control-planeclient.yaml- Pod with NSM-Agent-Linux control-plane and curl for testing connection to the webserver through NAT44 CNF
cd cnf-examples/nsm/LFNWebinar
kubectl apply -f cnf-crd.yaml
kubectl apply -f network-service.yaml
kubectl apply -f webserver.yaml
kubectl apply -f cnf-nat44.yaml
kubectl apply -f client.yaml
To confirm that client’s IP is indeed source NATed (from 192.168.100.10 to 80.80.80.100) before reaching the web server, one can use the VPP packet tracing:
kubectl exec -it cnf-nat44 -- vppctl trace add memif-input 10
kubectl exec -it cnf-nat44 -- vppctl trace add memif-input 20
kubectl exec -it client -- curl 80.80.80.80/show/version
kubectl exec -it cnf-nat44 -- vppctl show trace


------------------- Start of thread 0 vpp_main -------------------
Packet 1
...
TCP: 192.168.100.10 -> 80.80.80.80
...
TCP: 36822 -> 80
09:13:57:339487: ip4-rewrite
 tx_sw_if_index 1 dpo-idx 3 : ipv4 via 80.80.80.80 memif1/0: mtu:9000
 00000000: 02fe5720342202feae76266808004500003c298c40003f064cddc0a8640a5050
 00000020: 50508fd60050623163f400000000a002faf050f00000020405b40402

....
 TCP: 80.80.80.100 -> 80.80.80.80
 TCP: 52422 -> 80
...
Key Takeaways
Network Service Mesh provides complicated L2/L3 networking capabilities for Kubernetes. This is maps the concept of service mesh but works in L2/L3 instead of L4/L7. NSM extend Kubernetes original network model, provide a cloud-native way to deploy and use advanced L2/L3 network services. Network Service Mesh also can work with Service Mesh in the Kubernetes cluster. This is a big step towards the implementation of Cloud-native Network Function or SFCs in Clouds. Network Service Mesh steps in the next generation of NFV and will have a significant impacts on cloud, 5G, and Edge Computing!
References
Reuse
Citation
@online{frikin2023,
  author = {Frikin, Evgenii},
  title = {Introduction into {Network} {Service} {Mesh}},
  date = {2023-12-14},
  url = {https://efrikin.github.io/posts/Introduction-to-NSM},
  langid = {en}
}